Automatically convert PDF to Google Sheets with Docparser.
With many business documents in PDF format, extracting data to Google Sheets is a tricky and time-consuming manual task.
Whether you are a bootstrapped SaaS founder, an entreprenuer, a small business, or working in a large corporation, automating the export of data from PDF to Google Sheets doesn’t have to be difficult or expensive.
Convert PDF to Google Sheets
Save time and automatically convert PDF data to Google Sheets.
No credit card required.
Moving table rows from PDF to a Google Spreadsheet is a popular use-case amongst Docparser users. Making PDF table data accessible to the team in a Google Sheet (price lists, shipping reports, etc.) is just the first step.
Once your PDF table data is inside a Google Sheet, the possibilities are endless, thanks to the scripting and automation capabilities of Google Sheets. We see companies using Google Sheets as their data backbone for procurement (invoice, purchase orders, delivery orders, …) and logistic related processes.

Here are some common reasons you might need to do a data transfer from PDF to Microsoft Excel or Google Sheets — if you’ve experienced another problem that’s not listed, let us know.
- Sometimes, the data may look like a table stored inside the PDF, but it’s actually stored as plain text that looks like a table
- The table may span over multiple pages and you might end up copying page headers and footers when selecting multiple pages
- Once you paste the data into Microsoft Excel or Google Sheets, hidden table cells or characters may become visible
- The data can be scattered over multiple files, causing you to have to manually open each file which takes too much time
How do I convert PDF to Google Sheets?
Without the right tools at hand, moving table data from PDF to Google Sheets can be complicated. A complex toolchain is sometimes needed, including an OCR PDF Scanner, Zonal OCR, and advanced table extraction filters. Luckily, Docparser combines all those tools in one easy to use software.
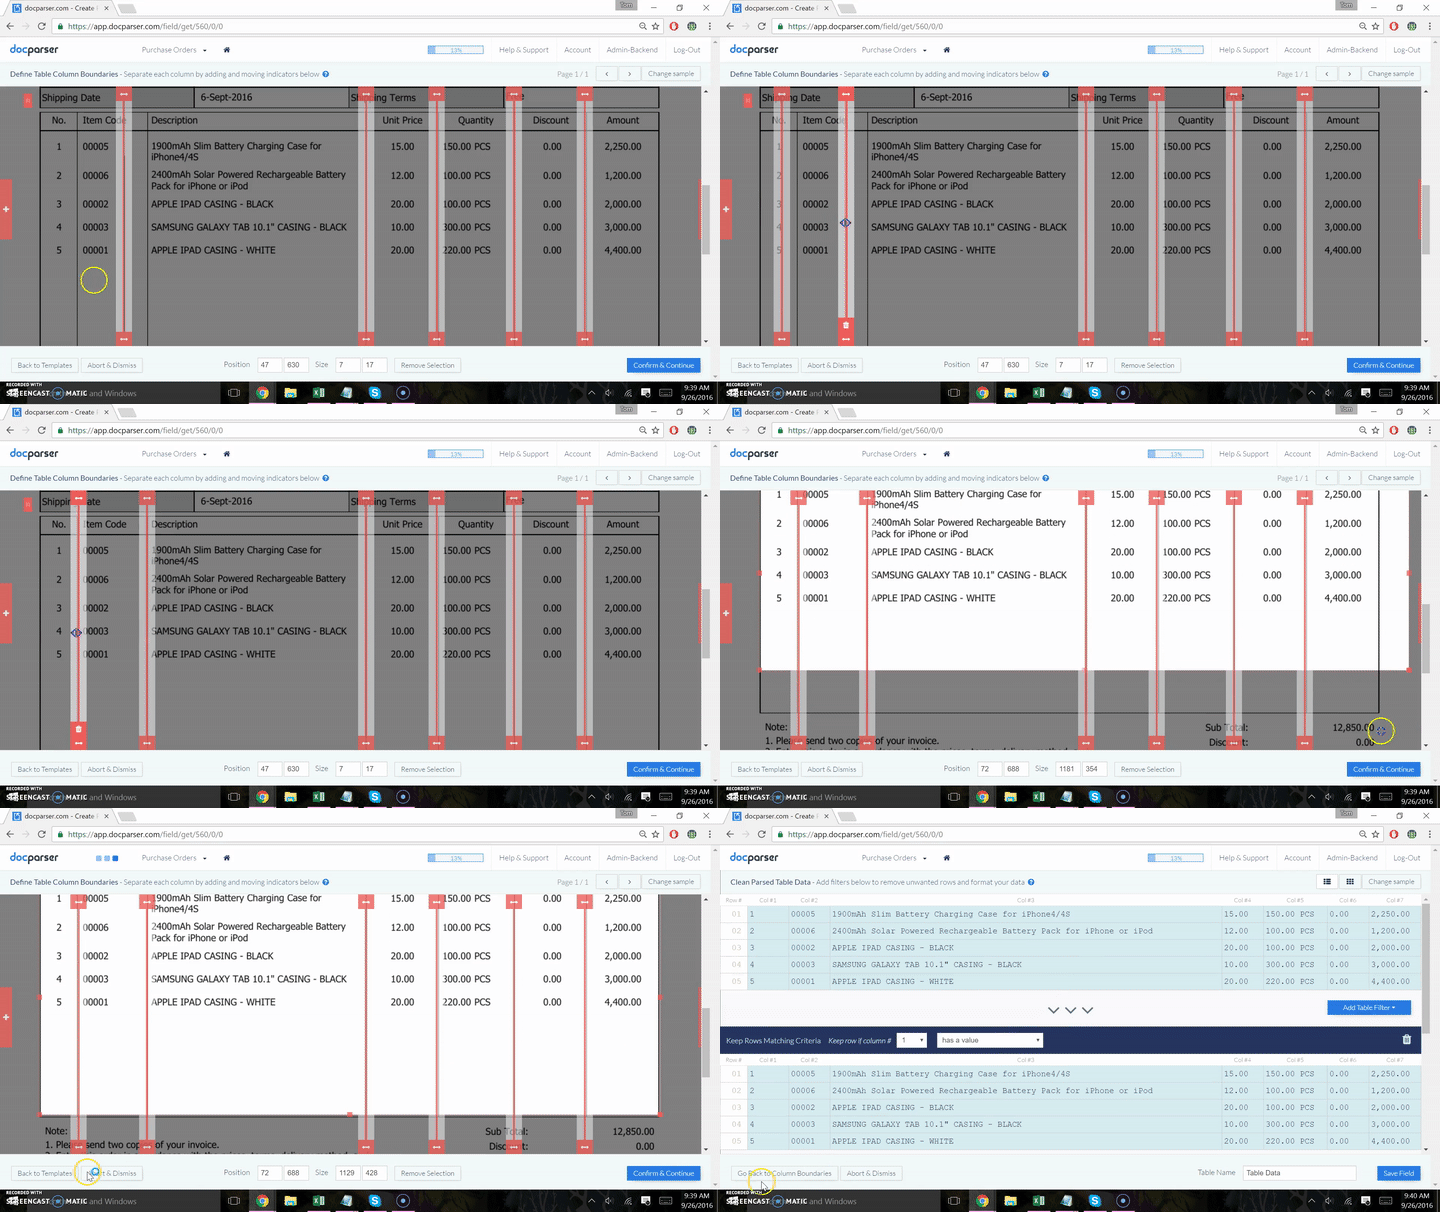
Our free account option lets you create a fully automated workflow that moves your PDF tables to Google Sheets in real-time. Have a look at the screencast below which shows you how easy it is to extract tables from PDF files with Docparser
Convert PDF to Google Sheets with Docparser
The steps below show you how you can easily convert PDF to Google sheet using our Docparser platform. Usually, going from Zero to Hero should not take longer than 20 minutes. Our app will guide you through the different steps as well and we provide additional screencasts once you sign up for your free account.
- Create a free Docparser account
- Upload your first PDF documents
- Create table parsing rules for your data (see below)
- Create a new Google Sheet in your Google Account and populate the first row with column names
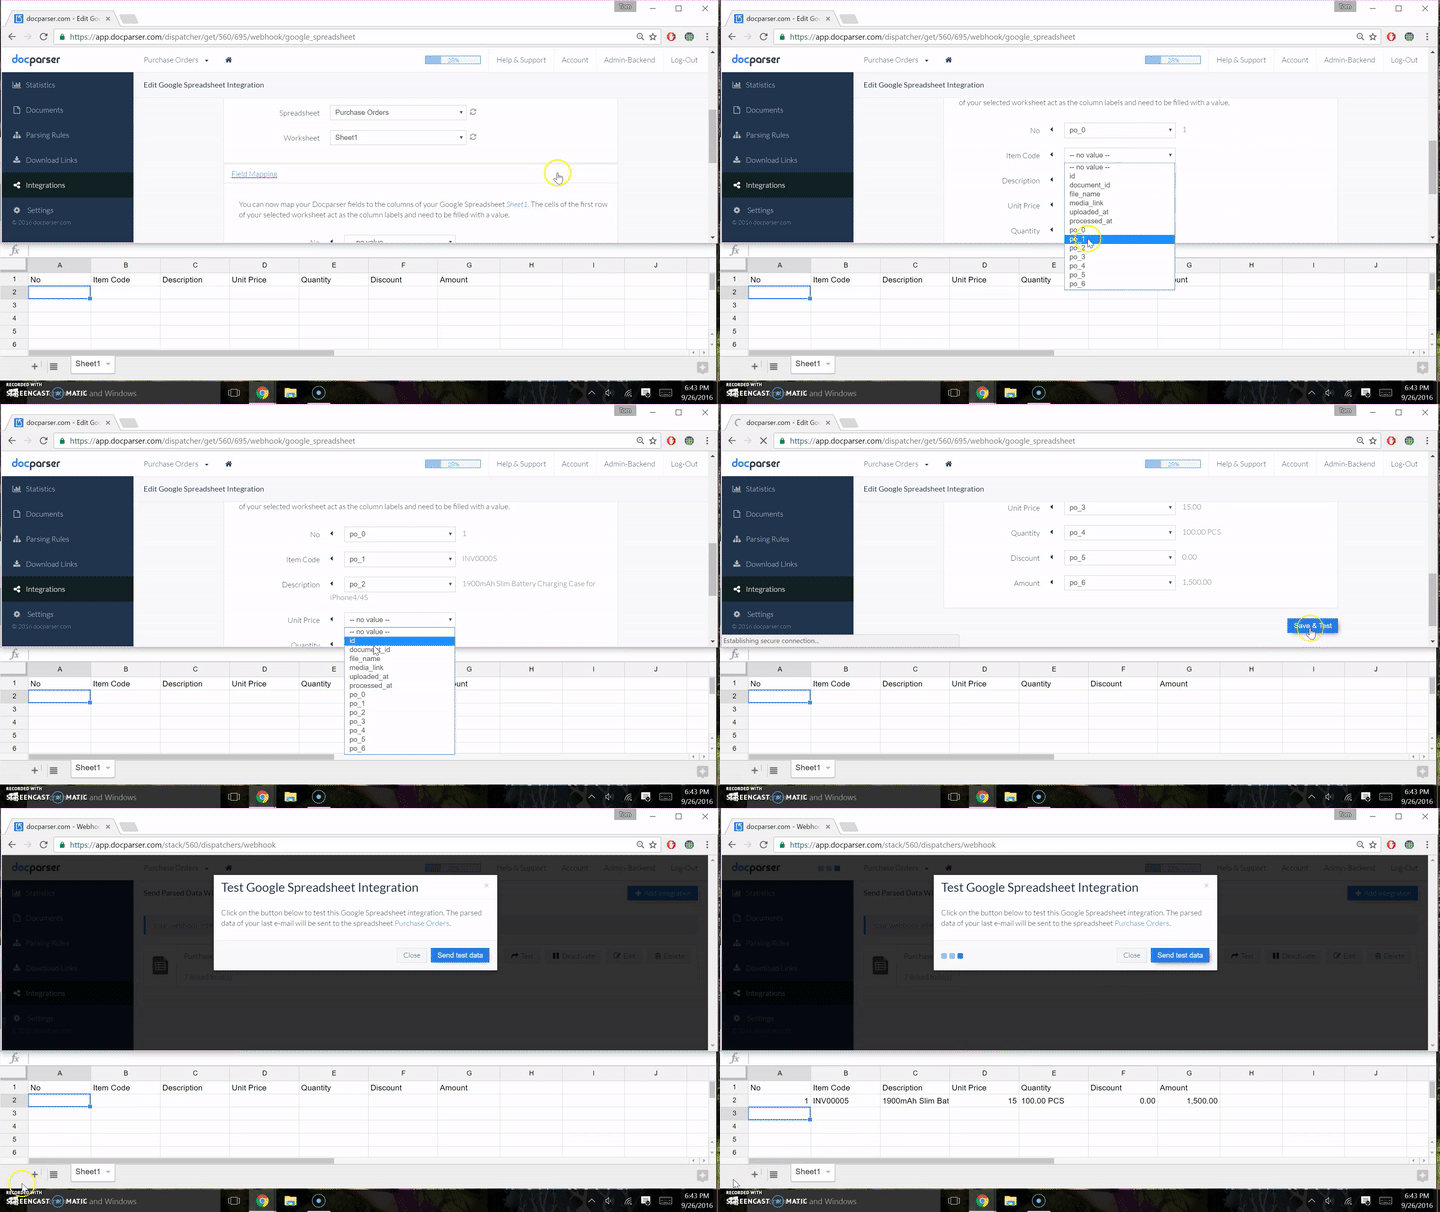
- Select “Integrations” from the left navigation inside the Docparser app and create a new Google Sheet Integration
- Once you select the newly created Google Sheet, you will be provided “Field Mapping”, where you will select the column names from the data you extracted, and map it to the names of the columns from step
- Click “Save & Test”, then “Test” again on the next prompt after the mapping is properly completed.
Many of the steps stated above are combined in one app interface, it is actually quite a simple process. The final product (a Google Sheet that has your data dumped in), is displayed below in a split-screen “mini screen-cast”. The data sent to the sheet below is from the data parsed in the screenshot directly above.
The final result: A fully automated PDF to Google Sheet workflow
Once you follow the steps listed above, you have a fully automated workflow at your fingertips. Each time you upload a similar PDF document to Docparser, our parsing engine will extract all table rows and automatically move the data to Google Sheets.
But this is just the beginning. You can also automate the way how you import PDF documents to Docparser. You can either email new documents to your Docparser account, import documents from your cloud storage, or use our REST API (in case you are a developer). Our sister company, Mailparser, can also help to convert your email to Google Sheets.
Done, it’s that easy to convert PDF to Google Sheets. By following the steps above you created a fully automated workflow that will convert your PDF files to table rows which are added to a Google Sheet in real-time. Please contact us should you need any assistance converting your pdf to a Google Sheet.
PDF Facts and Statistics
Although there are tons of articles on PDFs, we don’t think they’re straightforward enough and tend to be too technical, so we made our own.
What is a PDF?
PDF stands for Portable Document Format and is a type of file format. To conceptualize that, start by picturing a folder. Inside the folder are blueprints for the file (ex: fonts, graphics, text, etc.). These are the core pieces that build the modern-day PDF. This specific file format was invented sometime in the 1990s to share information between users that had different computer operating systems.
Why use a PDF?
Quite simply, you would use a PDF when you want the information to be easily consumed by multiple user systems. It is a format that’s not associated with any operating system (ex: Windows, Mac, etc); any specific hardware (ex: Dell, Toshiba, Lenovo, etc.); and it’s also independent of specific software. This means that you can create a PDF on a Dell computer using the Windows system, and your colleague could read it on Mac without any trouble or conversion software. PDFs break down barriers that are caused by different brands of hardware, operating systems, and software.
What are the popular uses of PDFs?
There are lots of ways that PDFs are used today — ranging from university and government data to user manuals, to invoices and receipts. Popularity has increased over the years and the format’s flexibility is an appealing option, as it allows users to create documents quickly and choose the level of security they prefer. A personal Docparser favorite when it comes to PDF features is “submit functionality,” where the PDF developer can create a form for users to populate. The form can then be emailed with just one click within the actual form.
Here are some fun facts highlighting PDF prowess:
- As of 2015, there were over 3.3 Billion users of the Internet
- Google states that there are over 30 Trillion pages available on the internet
- Nearly 80% of all non-HTML documents posted online are PDFs
While PDFs are pretty simple to create, extracting data from a PDF can be challenging. That’s where Docparser comes in — whether you’re trying to convert a PDF to a Microsoft Excel file, extract data PDF to Google Sheets, send on to your CRM or Cloud Storage platform, or dump it into your database for post-processing, Docparser has a tool for you.
What are Google Sheets?
Google Sheets is a spreadsheet application that is similar to Microsoft Excel that allows you to use and create spreadsheets while working with other people. It is part of the Google Docs Editors suite that also includes Google Docs, Google Slides, etc.
In terms of formulas and calculations, as well as format and features, Sheets and Excel are pretty comparable. Both allow you to manage and organize data in the form of a spreadsheet and customize the layout. The biggest difference is the ability to provide a shareable link to a Google Sheet and give collaborators access to your spreadsheet, allowing workplaces to all edit the same document in real-time.
Here are some additional features of Google Sheets:
- Display summarized data using pivot tables
- Add a pivot table based on your data via automatic suggestions in Sheets. Pivot tables can help you summarize data, identify patterns, and organize and manage information.
- Graph data with a single click
- Identify patterns in your data quickly with the “Explore” feature in Google Sheets. To just look at one subset of your data, select the columns or cells that you need, and the graphs will update in real-time. These graphs can also be added to a Google Slides presentation.
- Drive decisions with data via site metrics
- If you want to make better business and marketing decisions using insights from your customers, you can use Google Analytics. Find out how visitors are viewing and using your site, then use Google Script to import that data into Sheets.
- Work independently on shared data
- If you’re working with colleagues on the same spreadsheet, you can filter data without changing the view that others see of the spreadsheet. Save and name multiple filter views, for quick access and/or to sort later. Google Sheets also allows you to share views so people can immediately see the most relevant information.
- Track data updates
- Missing important changes commonly happens when multiple people are working on the same dataset. Using formatting rules in Sheets, you can track these updates so you don’t miss any — for example, if the sales team is tracking revenue in Google Sheets, you can set up rules to change the cell color once they reach their target.
- Search within big datasets
- It can be hard to find what you’re looking for if your spreadsheet has large amounts of data. Using the QUERY function in Google Sheets, you can filter, sort, add, and verify values in your data.
- Revert to earlier versions of data
- With all of your Google Sheets drafts in your Google Drive, you can go back to previous versions anytime. You can also see who made what changes to the data if you’re working with collaborators in the same sheet.
- Import data from another place
- You can consolidate all data from multiple spreadsheets into a single Google Sheets file using the IMPORT RANGE function.
- Receive quick calculations via formulas
- If you want to find the average, minimum or maximum value in a dataset, you can use a function in Google Sheets to automatically calculate these values. Whether you’re doing financial analysis, keeping track of specific stock prices, or trying to predict stock trends, you can use the GOOGLE FINANCE function.
- Scroll while keeping headings in place
- If you’re working on a large and detailed project plan or trying to enter large amounts of data for your accounts, you can keep column headings fixed in Google Sheets. This helps to always know what data you are viewing.to
- Display summarized data using pivot tables
Convert PDF to Google Sheets
Save time and automatically convert PDF data to Google Sheets.
No credit card required.
Automate your workflow with cloud integrations
Since Docparser was built for the modern cloud stack, we offer a wide range of cloud integrations. By connecting Docparser to other cloud applications, you can automate your entire document parsing experience.
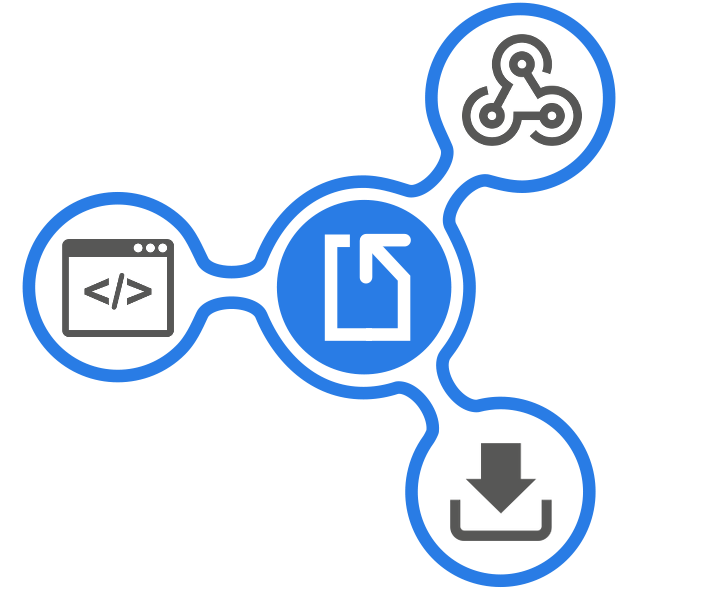
Using cloud integrations allows you to:
-
- Automatically import documents from various sources
- Copy your parsed data to where you need it
Docparser has integrations such as Google Sheets built-in and supports other popular cloud integration platforms such as Zapier, Workato, and Stamplay.
You can learn more about the different cloud integrations we offer and work with through the following resources:
You can dive deeper into how to set up cloud integrations via these articles in our knowledge base. If you’re a developer, consider checking out our REST API that allows you to import documents and obtain the parsed data using your favorite programming language. You can also send parsed data to your API in real-time using our webhook features.
Docparser download formats
You can also download your data in the following formats:
Setting up parsing rules on Docparser
First, it’s important to understand how to set up your first parsing rules. Here are some FAQs that come up in this process.
What is a parsing rule?
A parsing rule is simply a set of instructions that informs our algorithms on what kind of data you’re looking for. An example of this would be if you were to tell our algorithms to extract text from a specific position inside your document. From here, you can add more instructions to the parsing rule, including formatting a date, cropping or modifying words, and more.
There are different forms of parsing rules — but we’ve got a lot of templates for you to get started. Often, the parsing rules will be position-based, meaning that we extract the data from a fixed position in your document. Some other parsing rules may extract data from a variable position, which they do by looking for keyword markers inside the text of the document, or by applying pattern matching.
Does Docparser create parsing rules automatically?
This depends on what document template that you chose when you created your document parser. Typically, Docparser already automatically creates a few popular parsing rule options for you.
For a quick and easy setup, just click on “Create Document Parser” on the welcome page of the app.
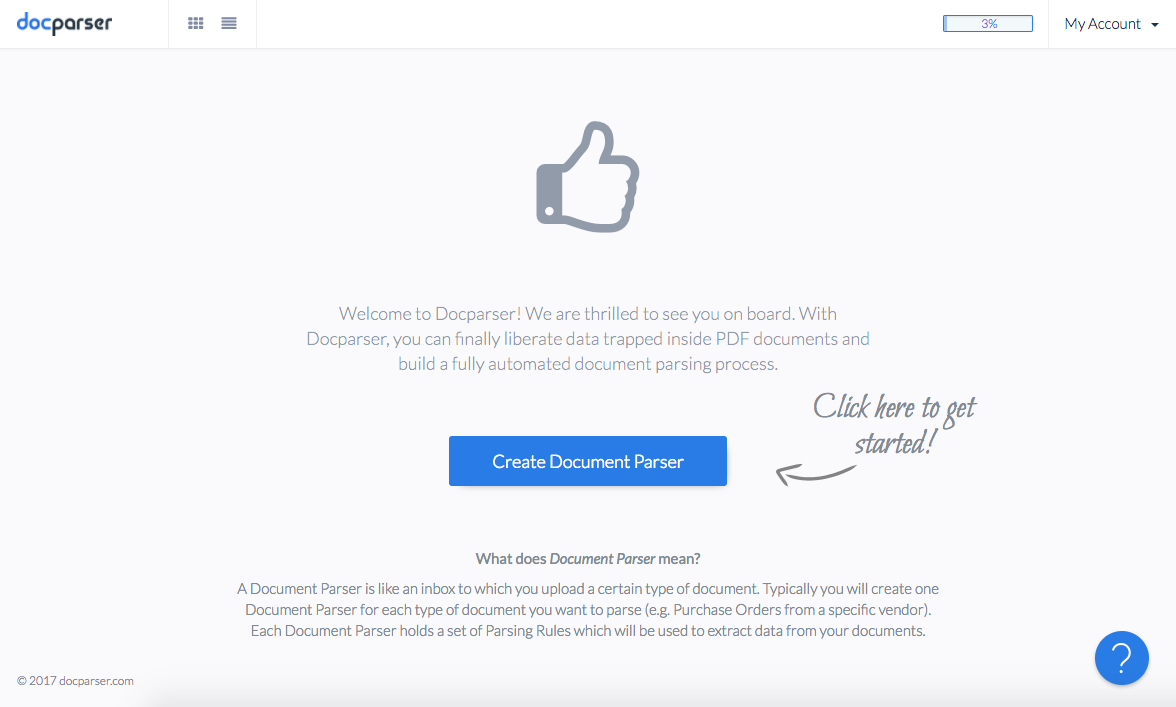
You will then be presented with common document types. Choose the option which best describes your use case.
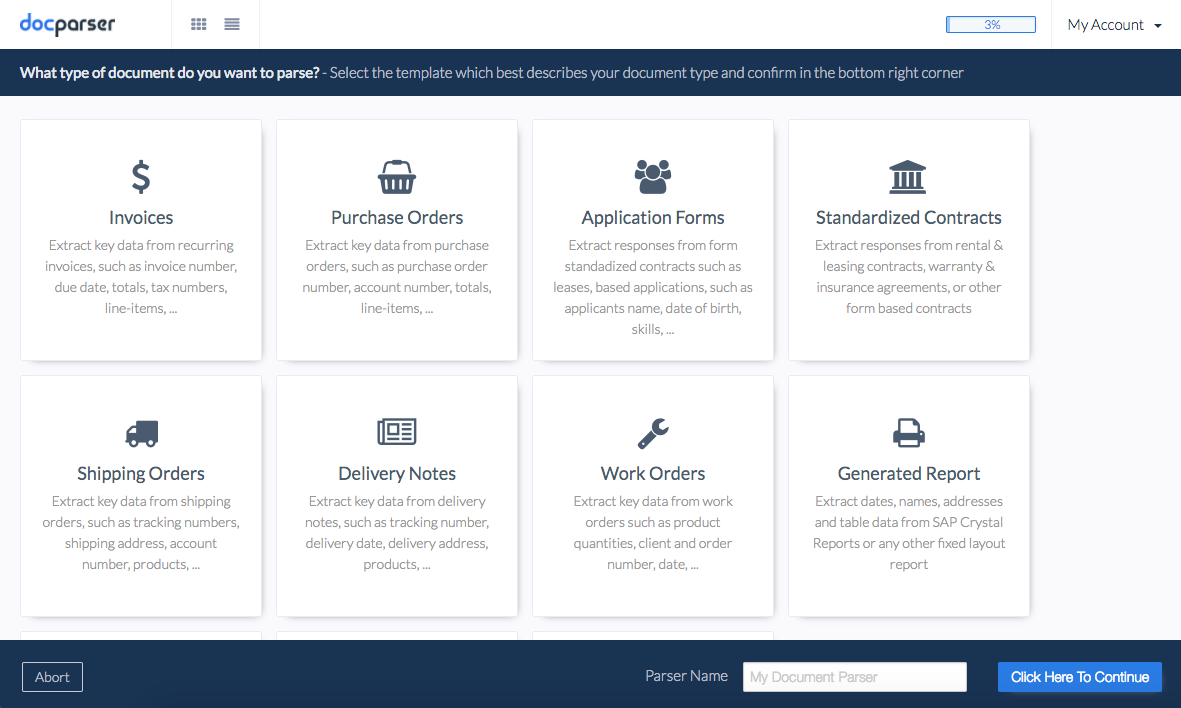
An example could be when you choose “invoice” as a document type, Docparser creates parsing rules automatically that extract the invoice date, number, and totals (Net, Tax, Carriage, Total). You’ll have to create new parsing rules manually for every other data field you want to extract from documents.
How many parsing rules do I need to create?
This one’s easy — you just create one parsing rule for each data field in which you want to extract. Say you want to extract the following fields: Invoice Date, Invoice Number, and Invoice Totals. This would mean you have three fields you want to extract from, therefore you will create three parsing rules. The only exception to this rule is table data, but we’ve got a table extraction tool that allows you to extract an entire table with one parsing rule.
How to create the first parsing rule:
This depends on the complexity of your data, but it shouldn’t take more than a few minutes. We recommend building a simple parsing rule first that extracts data from a specific position in your document, to get familiar with the tool. To do this, you can just choose “Text Fixed Position” from the parsing rule templates provided for you.

Next, the screen will prompt you to select the area where the data is located. You can then simply draw a rectangle around the position of your data field, and confirm selection in the bottom right corner.
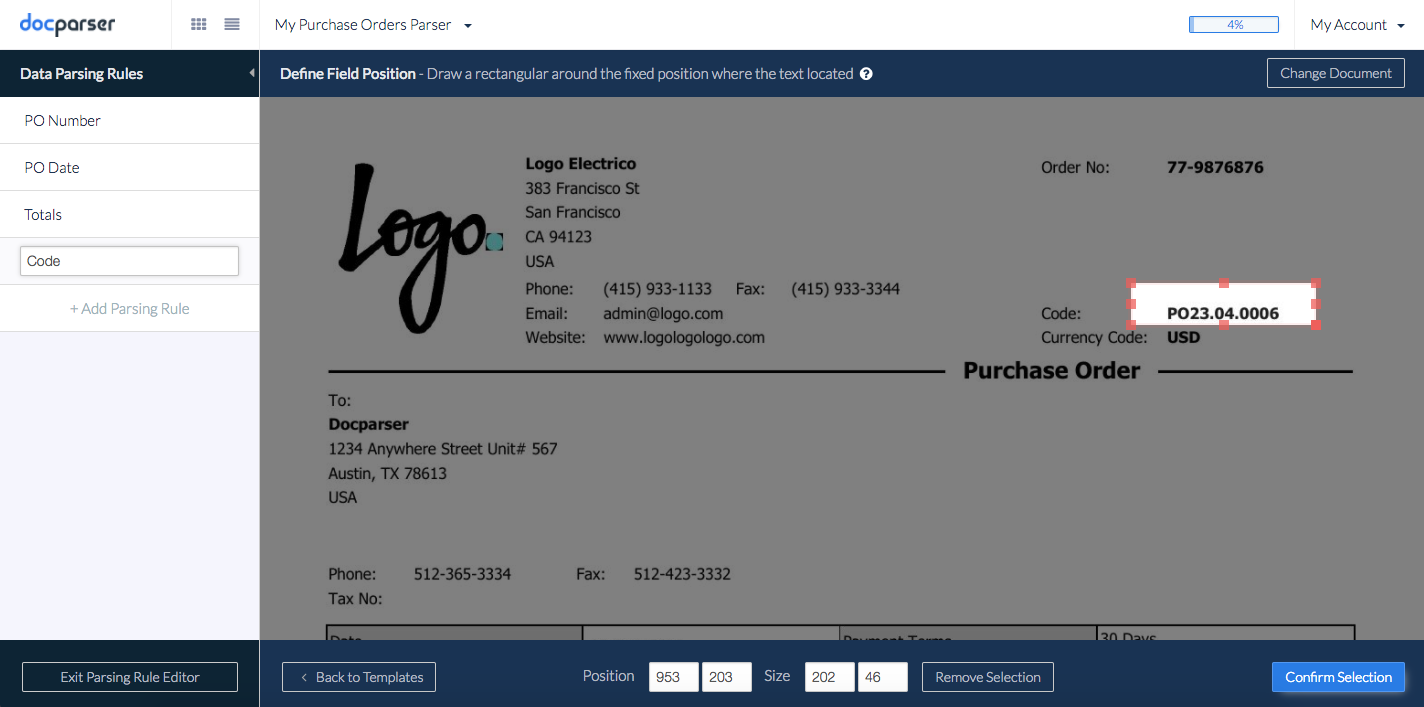
Finally, in the last screen, you can chain up multiple text filters to manipulate your data. This is an optional step, and you are able to save your parsing rule without adding more filters. You have now created your first parsing rule that extracts data from a fixed position.

This new parsing rule can be used to extract data from all imported documents within your document parser, including existing documents and new ones. Docparser provides a variety of parsing rule templates for all types of use cases. This ‘Text Fixed Position’ is the easiest option to get data from a fixed position, but we have tons of other templates that allow you to extract tables, data points located at a variable position, and more.
Uploading sample documents
Now that you’ve created your first document parser, it’s time to upload sample documents. There are two ways to do this — you can click on the “upload” box and navigate to your documents on your computer; or, you can drag and drop files into the “upload” box.

How many rule sets should be created?
Once you’ve done your first tests with Docparser, this is a good time to step back and figure out how to best manage and set up your rule sets based on each document type or layout you’re using. Because there is no one-size-fits-all solution to document data extraction, we’ve designed Docparser to be flexible and easy to use.
Here we’ll outline some different ways in which you can set up Docparser. As you’re thinking through the best approach for your use case, think of the following questions:
- How many different document layouts do you want to process?
- Are you aware of the layout of a document before importing it to Docparser?
- What does the data that you want to extract from each layout look like?
- How are documents imported to Docparser, and by who?
If you’re not sure what we’re referring to when we say “document layout,” you can reference this article.
We’ve compiled some common scenarios below for you to go through and learn about. Within these, there are different ways of importing your documents to Docparser, which you can learn about here. If you’re still not sure which direction to go in, you can always reach out to our support team.
What if I only have a few document layouts?
The setup of Docparser will be pretty straightforward if you just have a couple of document layouts. You just need to create one document parser for each layout and import the documents accordingly. Each specific document layout will have a document parser tailored with a set of parsing rules.
What if I have a document layout where the data positions vary in each document?
In this use case, you will generally want to create a document parser for each layout that is capable of parsing all variations. The following approaches are recommended:
- Make parsing rules that can catch data from variable positions
- Make additional parsing rules that cover every data field in each layout variation
- Check out our “Layout Models” feature. This is currently a BETA feature, but you can get early access.
What if I have various layouts, and I can identify the layout prior to importing the documents?
We recommend building one document parser for each layout if you’re able to identify each document layout on your end. There’s no limit to the number of document parsers you can build in the Docparser tool, and it’s common that our customers have hundreds of document parsers.
With each document parser having one set of parsing rules, this should match the document layout exactly. You can identify the document type and import the documents to the matching document parser via our API, by email, or on the app.
What if I have various layouts, but cannot identify the layout when importing documents?
Say you’re receiving documents from third parties. It would be expected that you then cannot identify the document layout prior to uploading it into Docparser. This may mean you can’t create different document parsers, and send the documents directly to a specific document parser.
But worry not — we have an advanced tool called Layout Models that lets you process multiple layouts with one single parser. How it works is, you create one set of parsing rules that lets you identify the document layout. Then, you can create additional sets of parsing rules within the same document parser (one for each layout).
As a final step, you can define document routing rules (ex: if A, then B) which send the documents to the correct layout model.
I have an unknown quantity of document layouts, probably thousands
At this point, you may want to evaluate whether or not Docparser is an efficient fit for your use case. Our tool was created to extract data from recurring documents following a certain known set of layouts. However, we do offer a variety of extraction tools that don’t just rely on the visual representation of the date — so let’s talk, and see how we can help.
PDFs in Email Attachments
Do you often receive emails that contain PDF documents full of important data? Not sure how to go about aggregating and organizing it? We’ve got good news for you — Docparser makes it easy to extract data from PDF email attachments.
Plus, if you have recurring PDF files with similar physical layouts, you can just email them to the Docparser app and receive structured data back — simple as that.
You can then upload additional PDFs with the Docparser email option, once you have made and tested out your PDF layout parser. First, choose the layout parser you’d like to send attachments to. Then, select “Settings” from the navigation bar, and then you’ll see a layout parser “inbox.”
You now have a couple of options with your Docparser email address that you can send future attachments to.
- The first option is to start by forwarding attachments to your email address. The address above is a reference, but you will have your own unique address for each PDF layout parser you create.
- Another option is to CC/BCC (send a copy) to the Docparser email address so that the process is done automatically. This option is what most clients prefer with recurring attachments — they can easily add their Docparser email address as a recipient of the email attachments. Then the files are loaded into their account under the parser layout they selected to send to.
We also suggest reviewing your automatically uploaded PDFs (re: Option 2) in your parser layout to make sure they were introduced into the parser — also, to ensure the information was parsed correctly.
You now have limitless options on what to do with your data by using Docparser, something that many companies across a wide range of industries have realized. Whether it’s direct downloads of data in multiple file formats, to integrations, we’ve got a solution for you.
If you handle large amounts of recurring emails, it may be a better fit for you to make use of our tool that’s specifically designed for email parsing, Mailparser.
Similar to the Docparser process, it extracts data from the email or from attachments within the email. Learn more about Mailparser here.

With our Mailparser.io tool, you can create a fully automated workflow by pulling table rows from PDF files.
After the initial setup, you just have to forward your PDF files to a @mailparser.io email address and the tool will pull out the table rows for you, copying them to your Google Sheets file instantly.
How to convert PDF email attachments to Google Sheets
- Sign-up for a free account at Mailparser
- Confirm your email address
- Create a @mailparser.io inbox to which you will send your files by e-mail
- Create a parsing rule which will extract table rows from your PDF file
- Add more parsing rules to parse other data fields from the PDF (e.g. Date of Order, Delivery Address, …)
- Create a connection between your Mailparser inbox and Google Docs (Webhook Integration)
Convert PDF to Google Sheets with Docparser
Getting started with Docparser is easy and takes only a couple of minutes. Just create your free account, upload some sample documents and say goodbye to manual data entry.

“Within 20 minutes I was able to automate a business process that used to take an hour of manual time. Docparser is a no brainer for extracting data from PDF document
Docparser Features
Import your business documents
- Docparser automatically fetches your PDF files and scanned images from various sources. Connect your cloud storage provider (Dropbox, Box, Google Drive, OneDrive), use our REST API, email your files in as attachments, or easily upload them using our secured application.
Train your custom document parser
- Based on parsing rules that are tailored to your needs, our parsing engine extracts relevant data fields from your documents. Making parsing rules for our PDF and Document Parser is simple and doesn’t require any coding. Using Zonal OCR technology, advanced pattern recognition, or anchor keywords, Docparser can identify and extract data. After setup, new documents are automatically processed and you receive structured, simply-handled data in return.
Move your data where it belongs
- From adding a new row in a database to creating or updating a record in your ERP or CRM system, to sending business data from PDF to Google Sheets, we’ve got something for you. Since Docparser was built for the modern cloud stack, it’s simple to connect to hundreds of cloud applications — including our integration partners Zapier, Workato, and MS Flow. Plus, you can download your data in a variety of formats, including Excel, CSV, JSON, or XML.
Docparser can be your go-to tool for all your document parsing needs, especially when you need to take data from a PDF and convert it to a Google Sheets document.
We hope you now feel like you have more of a grasp on how to use Docparser, no matter your use-case, to better extract and manage your data. You should now be able to save time with this fully-automated workflow and reach new heights in productivity.
Convert PDF to Google Sheets
Save time and automatically convert PDF data to Google Sheets.
No credit card required.
